
The upside of having a bunch of snow is the wonderful fabric you can make by snow dyeing. I followed the directions here – http://tinyurl.com/anx9o5w
You will need fabric – I used a pfd (prepared for dyeing) kona cotton, procion dye, soda ash, urea (optional), large tub(s), rack, plastic cups, utensils reserved for dyeing.
First soak the fabric in water with soda ash. I did as much as would fit in my bucket and soaked for 15-30 minutes.
I’m dyeing in large plastic bins. I put fat quarters in the bottom of the bin. They will soak up the dye after it’s gone through the main piece of fabric. I did several different techniques to arrange the fabric for different dyeing results. (Click on the picture for a larger image)
-

- Traditional tye dye with rubber bands
-

- Scrunched up fabric with one rubber band around it to keep it “scrunchie”
-

- Rubber banded
-

- knotted
-
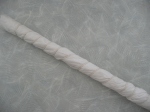
- One shibori technique – wrap the cloth around a pole – I use pvc pipe and wrap with a string.
-

- Then push the fabric towards the middle.
I put the rack on top of paper cups and then added the larger pieces of fabric. One I twisted and the other two I just bunched up.

Then pile on the snow! Put at least 3 inches over the top of the fabric.
Mix up the fabric dye according to directions. Using procion dye is more trouble but the results are worth it. The colors will be much brighter. Adding urea makes water wetter – fabric with urea water will take longer to dry. The longer the fabric is wet the more dye it can absorb. With procion dye the dye is not just coating the fibers but the little dye molecules are seeking out fabric molecules to bond to and the longer they have to “look around” the better. After making the dyes pour them over the snow. I used blue and yellow dye in one tub and blue and purple dye with a bit of yellow in the other. I don’t worry about what the final color will be I just hope for “happy accidents”!

Dye over the snow
I put one bin out in the garage and left one in the kitchen. As the snow melts the dye will hit the fabric at different times. Because of the time it takes for the snow to melt some of the dyes may separate into their component parts. Some dye colors strike faster than others (rush to hook up to the fibers) while the slower dyes will have fewer places to “hook up”. You’re never really sure what you’ll get until you’re done.
I let both containers sit over the weekend – I started the process Friday morning and took the fabric out on Monday. The snow melted in the one inside by Saturday morning. The one out in the garage took longer. After taking the fabric out rinse it until it the water runs clear. Then wash in hot water in Synthrapol. When the fabric hits the water all the little dye molecules that haven’t “hooked up” go looking – and usually end up on something white and cotton in your laundry. Using synthrapol is like putting all the single ladies on a bus and driving them out of town.
Once dry you finally know what your fabric looks like. Definitely liked the tub that stayed in the garage better.
Here’s the results. I couldn’t have been more excited! Happy Snow Dyeing!!!
-
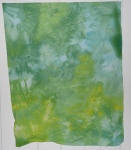
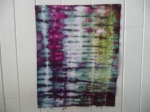
- Blue and Yellow tub kept inside
-

- Blue Yellow close up
-

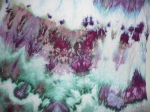
- Shibori wrapped
-

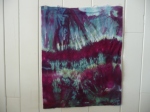
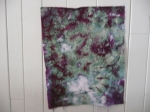
- Purple Blue Tub, twisted, kept in garage
-
- Twisted close up
-

- Twisted Close Up
-

- Purple Blue Tub, scrunched, kept in garage
-

- Scrunched close up
-

- Scrunched close up
-

- Scrunched close up
-
- Knotted
-

- Tye dye
-
- Scrunched
-
- Rubber banded
